Where do I get the app?
HRV4Biofeedback is currently available on the Apple Store, at this link
WHAT IS HRV BIOFEEDBACK?
Heart Rate Variability (HRV) Biofeedback is a technique that can directly affect physiological and psychological factors through deep breathing exercises and is an ideal strategy to help us self-regulate and better cope with stressful situations
Practically speaking, HRV Biofeedback consists of providing an individual with real-time feedback on instantaneous heart rate and respiration changes while being instructed to breathe at low frequencies.
The app will guide you through such exercises
Practically speaking, HRV Biofeedback consists of providing an individual with real-time feedback on instantaneous heart rate and respiration changes while being instructed to breathe at low frequencies.
The app will guide you through such exercises
The homescreen
In the homescreen, you can see your daily Biofeedback minutes, and your weekly total. Our recommendation is to start with 3 to 5 minutes a few times per week, and try to gradually make biofeedback a daily habit. Aiming for 5-10 minutes daily, or even twice a day if possible, could be an effective and sustainable goal
Starting a session
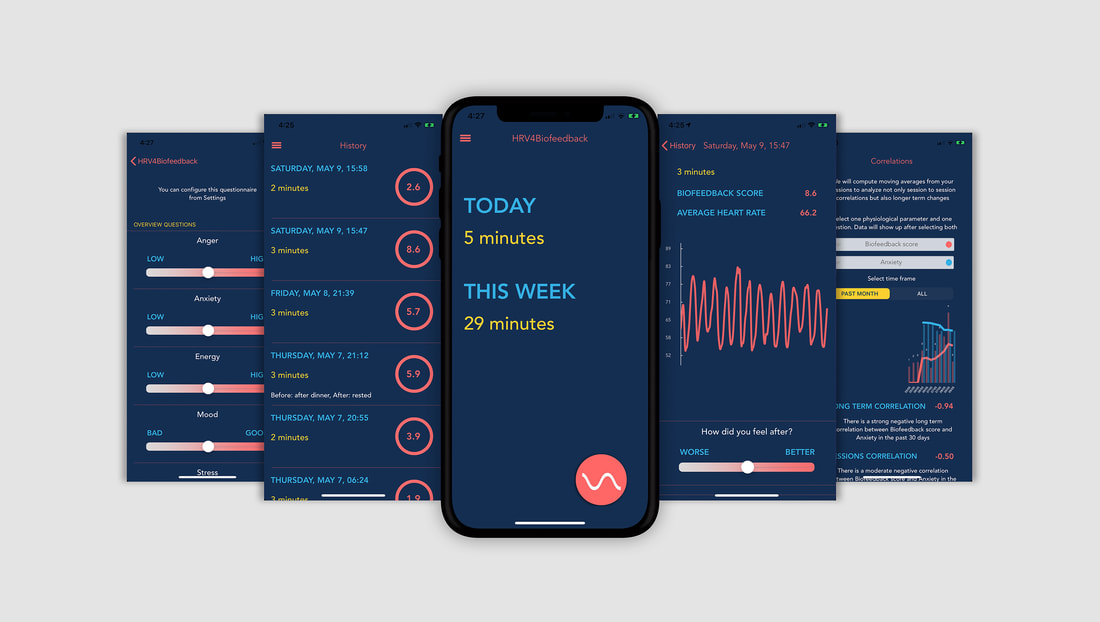
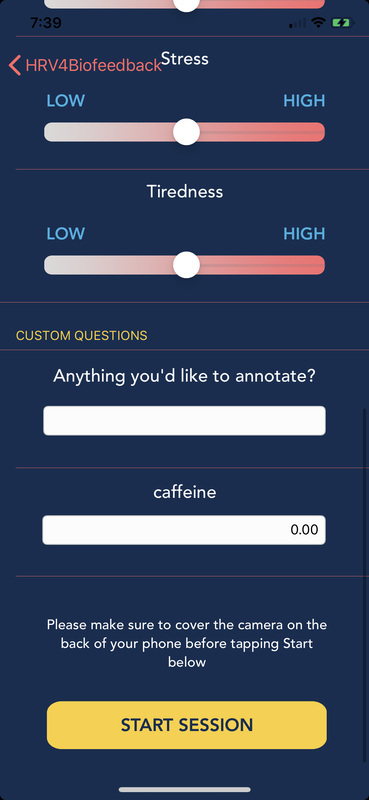
To start a session, tap the pink button in the bottom right corner. You will first be prompted with a screen where you can annotate how your feeling before the session, for example your stress level, anxiety, mood, etc. - can all be annotated
You can also add up to 5 additional parameters to track, all of these parameters will later on be available for you to analyze in terms of trends over time, and correlations with the biofeedback session
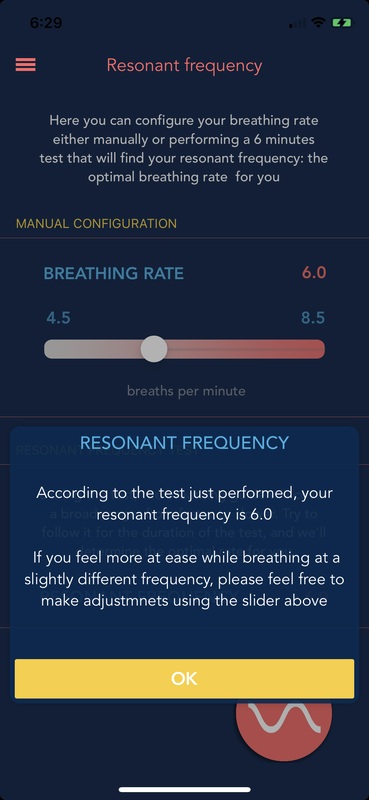
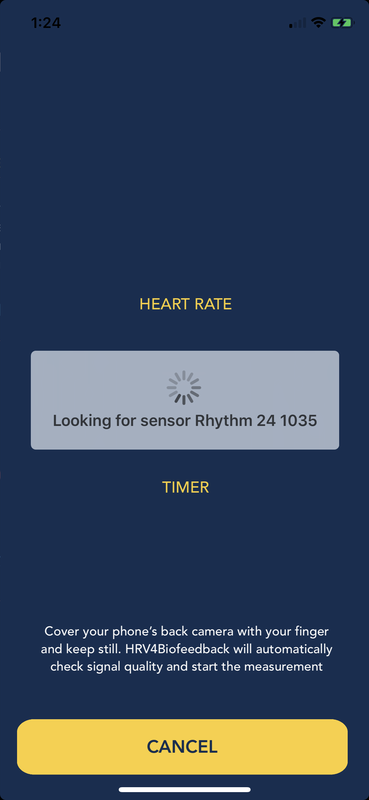
During the measurement, simply focus on following the breathing pacer. You will see your heart rate increasing as you breathe in, and decreasing as you breathe out. At the beginning, the app will use a standard 6 / breaths per minute breathing frequency. You can adjust the breathing frequency from the Breathing menu. In the Breathing menu, you will also be able to determine what is the best frequency for you, based on a simple test. The best frequency for your specific case, is called the resonant frequency.
After the measurement, you will be able to report how the session affected you, and if the session helped you unwind
If you use the camera-based measurement, make sure to check our camera based measurement guidelines
You can also add up to 5 additional parameters to track, all of these parameters will later on be available for you to analyze in terms of trends over time, and correlations with the biofeedback session
During the measurement, simply focus on following the breathing pacer. You will see your heart rate increasing as you breathe in, and decreasing as you breathe out. At the beginning, the app will use a standard 6 / breaths per minute breathing frequency. You can adjust the breathing frequency from the Breathing menu. In the Breathing menu, you will also be able to determine what is the best frequency for you, based on a simple test. The best frequency for your specific case, is called the resonant frequency.
After the measurement, you will be able to report how the session affected you, and if the session helped you unwind
If you use the camera-based measurement, make sure to check our camera based measurement guidelines

|
|
|

|
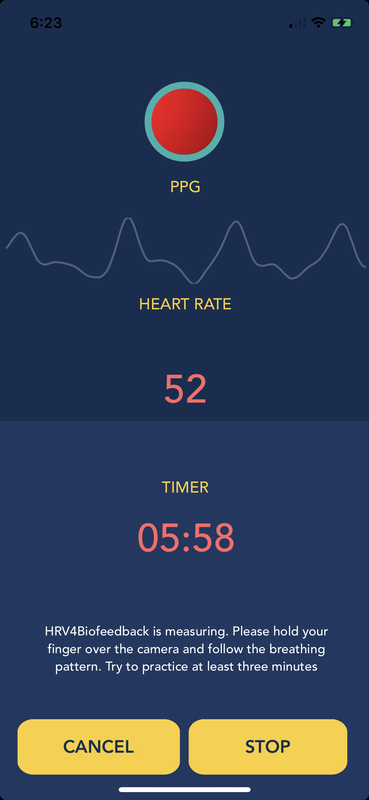
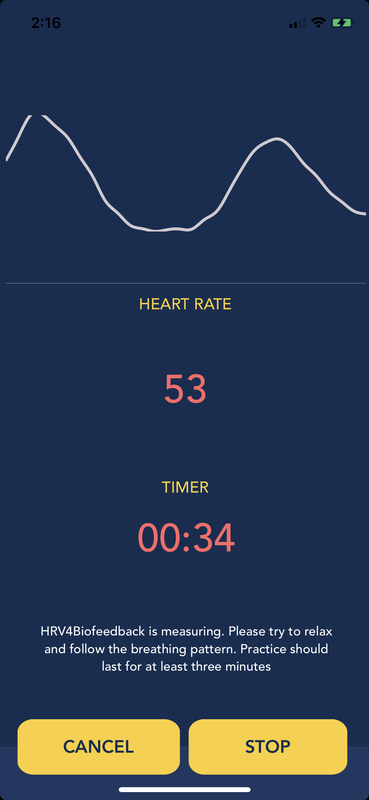
The measurement screen
The measurement screen shows the following:
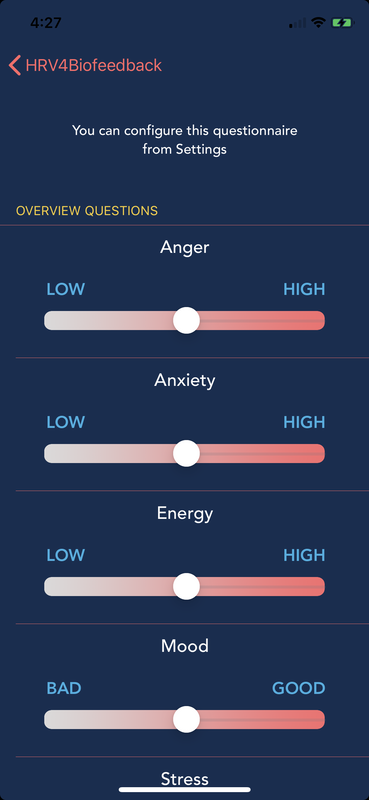
- A breathing pattern taking the whole screen. This is the part you should focus on, following the breathing pattern with deep breaths that will stimulate your parasympathetic system
- A top panel used to make sure your beat to beat heart rate data is measured correctly. Here you can see the camera view, which should show a red dot if you place your finger correctly on top of the camera, and the PPG signal. The PPG signal represents the heart beat, and should show a smooth waveform similar to the one below. You could consider this top panel only useful in terms of signal quality, and do not really need to focus on this while doing your sessions, provided a smooth signal is being shown.
- A central panel showing your instantaneous heart rate. This is the most interesting bit after the breathing pattern. Here you will see the heart rate increasing when you breathe in, and decreasing when you breathe out. After 30 seconds, we will also show a graph of your heart rate over time, which should look like a smooth waveform going up and down depending on your breathing.
- A bottom panel including time, instructions and buttons to stop or cancel your session. This should be pretty straightforward.
|
|
|
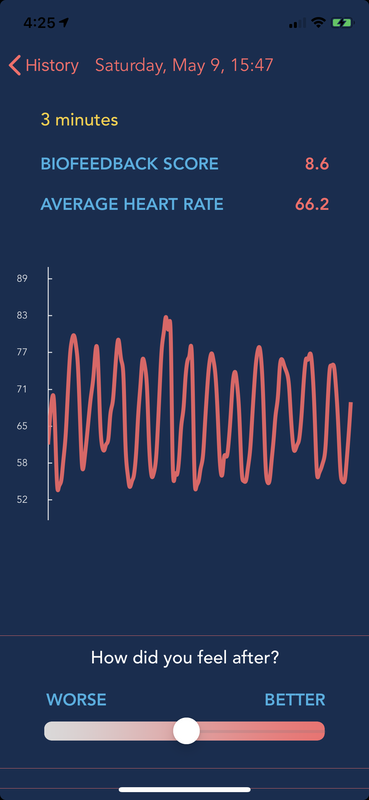
ExplorING Your Sessions
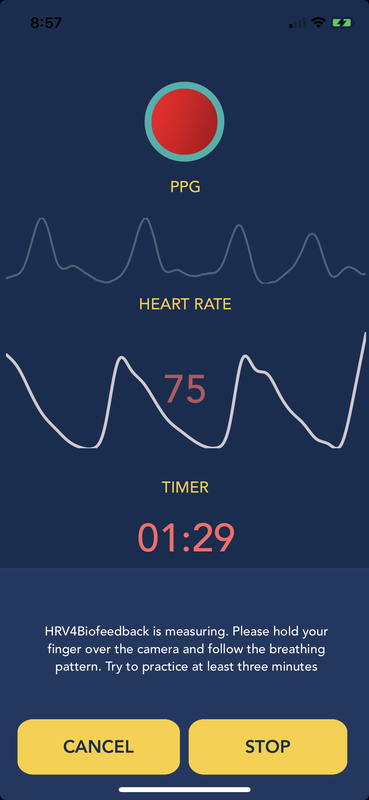
Tapping Menu, you will see a few items where you can explore and analyze your sessions. The History item, provides a list of all of your sessions, your biofeedback score, questionnaires and annotations. Tapping a session will show you your heart rate for that session as well
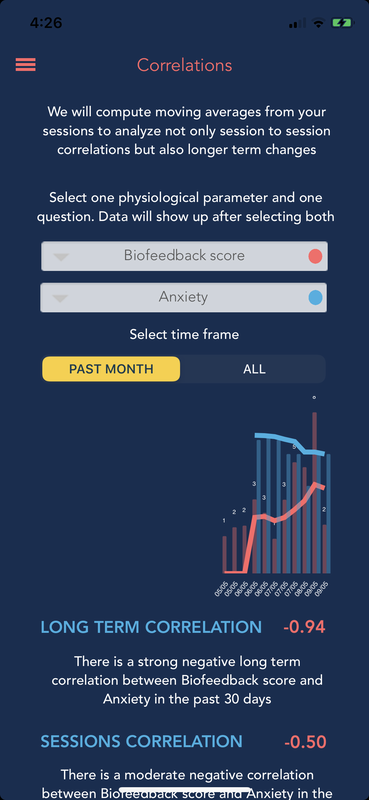
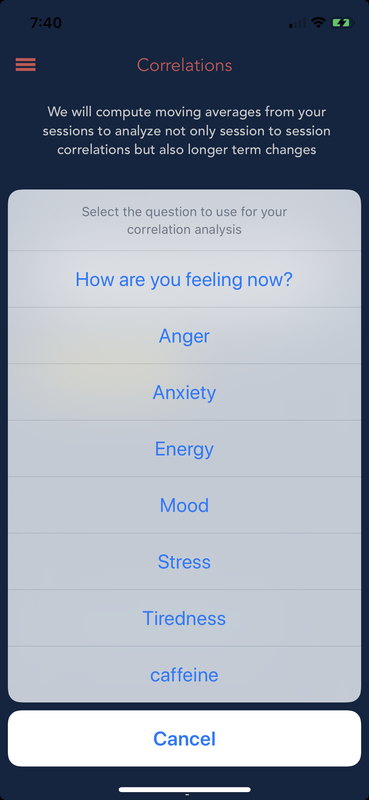
In the Correlations menu, you will be able to analyze the relationship between biofeedback variables (for example heart rate or the biofeedback score) and the information you have annotated via the questionnaire. Are you feeling better when you are able to practice for longer or when you achieve a higher score?
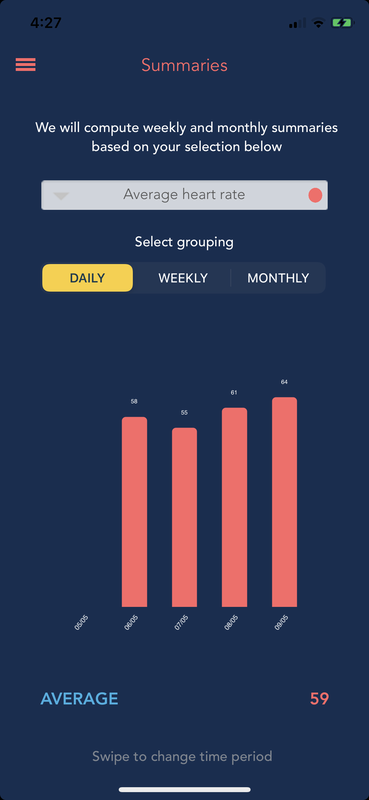
Finally, in the Summaries menu, you will be able to see daily, weekly and monthly reports of both your biofeedback variables and your annotated questionnaires
In the Correlations menu, you will be able to analyze the relationship between biofeedback variables (for example heart rate or the biofeedback score) and the information you have annotated via the questionnaire. Are you feeling better when you are able to practice for longer or when you achieve a higher score?
Finally, in the Summaries menu, you will be able to see daily, weekly and monthly reports of both your biofeedback variables and your annotated questionnaires
|
|
|
|
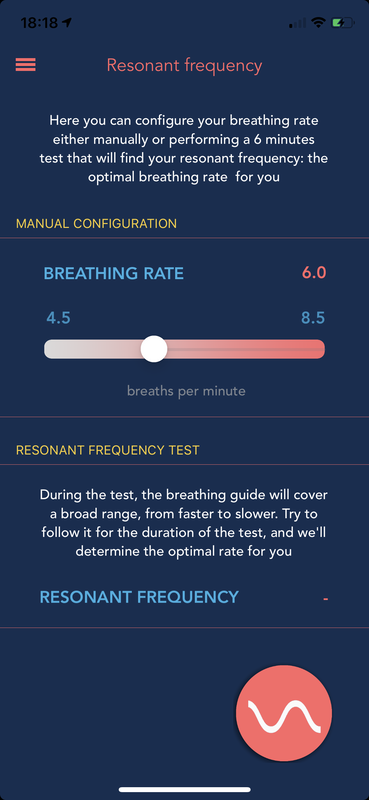
Breathing and the resonant frequency
HRV Biofeedback requires breathing at low frequencies, which stimulates parasympathetic activity. Experimental studies have found the highest amplitudes in instantaneous heart rate oscillations when breathing at approximately 0.1 Hz. This means 6 breaths per minute and is the default in the app
However, the frequency at which amplitude is maximal for a person can be slightly different. This is what is called the resonant frequency and can vary by up to 2 breath/minute between people
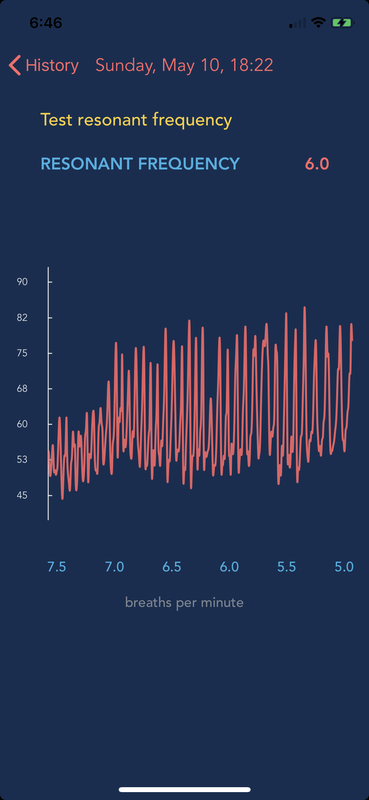
Your resonant frequency can be established with a protocol that consists of breathing at different frequencies for a few minutes until the frequency that elicits the maximal amplitude is found
You can do so in the HRV4Biofeedback app, from the Breathing menu. The test will last 6 minutes and works as follows:
While the resonant frequency test should find the optimal breathing frequency for you, you might feel more at ease with a slightly different breathing rate. Feel free to always change the breathing rate using the slider in the Breathing page, the app will use your configuration for the following sessions
However, the frequency at which amplitude is maximal for a person can be slightly different. This is what is called the resonant frequency and can vary by up to 2 breath/minute between people
Your resonant frequency can be established with a protocol that consists of breathing at different frequencies for a few minutes until the frequency that elicits the maximal amplitude is found
You can do so in the HRV4Biofeedback app, from the Breathing menu. The test will last 6 minutes and works as follows:
- The guided breathing will change over time during the 6 minutes, going from 7.5 to 5 breaths / minute
- You should try to follow the pacer for the entire duration of the test, which is very similar to a regular session, but with the main difference that the breathing frequency will automatically change
- Another small difference is that this time the timer will show a count down, starting from 6 minutes. Once the test is finished, the app will automatically stop the measurement and compute your resonant frequency, as shown in the screenshots below
- You will also be able to see the heart rate trace for the entire recording, which normally shows larger oscillations as you do deeper breaths towards the second half of the test
While the resonant frequency test should find the optimal breathing frequency for you, you might feel more at ease with a slightly different breathing rate. Feel free to always change the breathing rate using the slider in the Breathing page, the app will use your configuration for the following sessions
|
|
|
|
The Biofeedback score
The score in the app represents how well you are practicing deep breathing according to your resonant frequency, as well as the duration of the exercise. You will see that if you are not focused in your session, or struggle to perform the exercise correctly, the score will not increase much over time. On the other hand, correctly following the pacer and deep breathing, will lead to a higher score over time. In general, the higher the score, the better
While the score is provided so that you can quantify the exercise, note that what matters the most in this case is the deep breathing exercise itself, and how this might impact your baseline physiology
You can find more technical details on the biofeedback score, at this link
While the score is provided so that you can quantify the exercise, note that what matters the most in this case is the deep breathing exercise itself, and how this might impact your baseline physiology
You can find more technical details on the biofeedback score, at this link
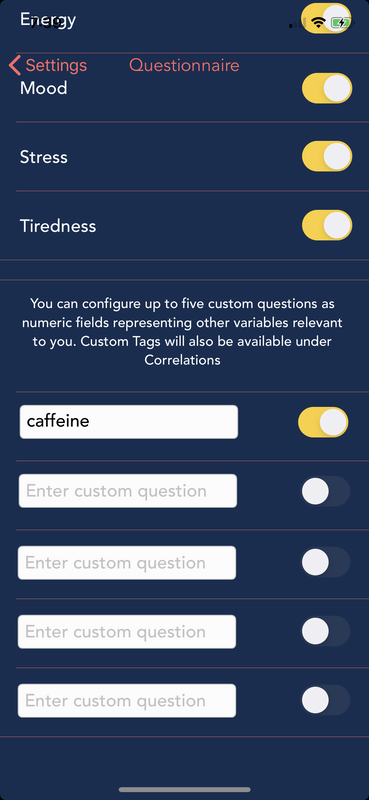
Custom annotations
In the app, you can annotate up to 5 additional custom questions as numerica variables that you will be able to track and correlate with your biofeedback sessions via the Correlations and Summaries menu. To add a custom question, go to Menu - Settings - Configure questions and tap the text box, you'll be able to enter a name for your question there. Then, before each session, the new question will automatically appear below the standard ones
|
|
|
|
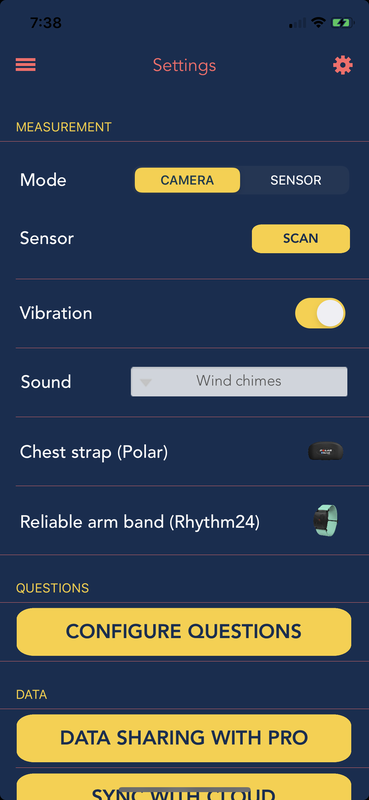
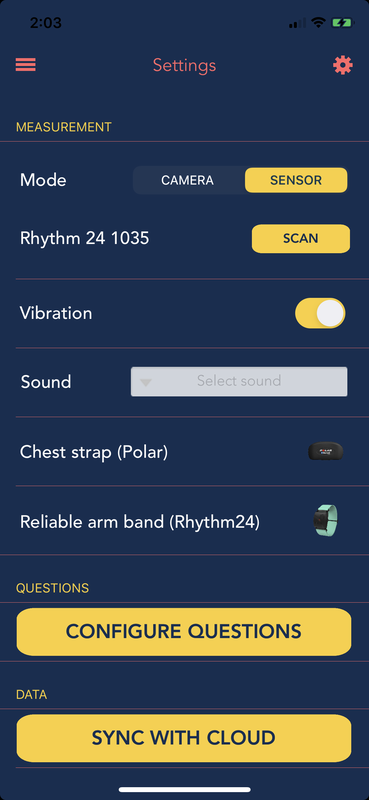
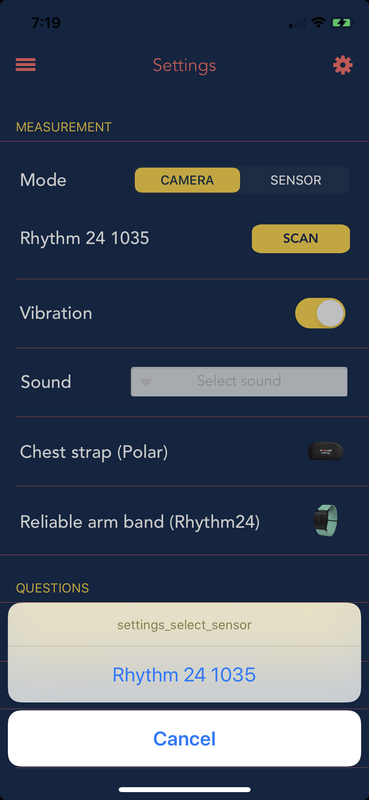
Using a sensor instead of the camera
If you prefer to use a sensor instead of the camera, we recommend the following:
- Polar H7 or H10 chest straps
- Scosche Rhythm24 armband
- Corsense finger sensor
- Kyto earclip
|
|
|
|